
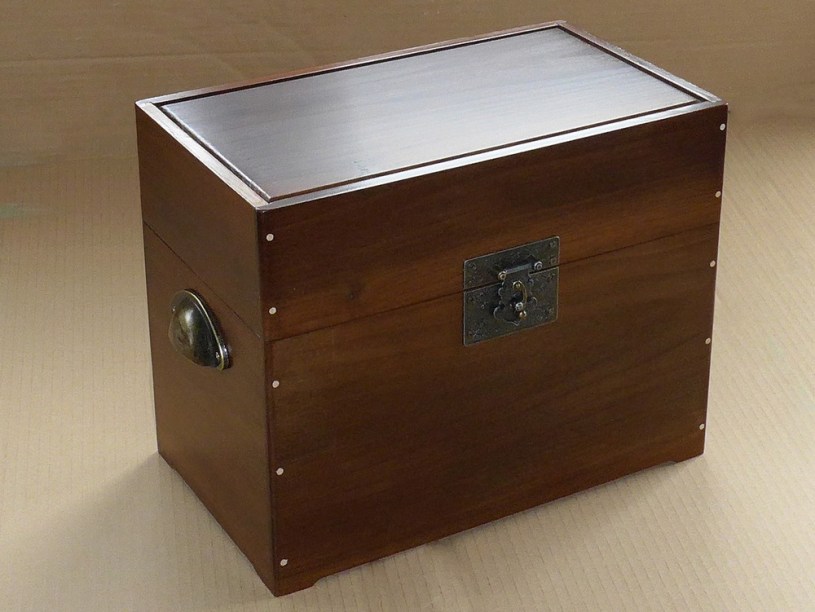
This is a long post, which reflects the time spent, and the complexity of the project. The finished box is constructed from 48 individual wooden parts plus 33 metal components making up the hardware, screws, etc.
The idea for this project was to make a box for my son in which he could keep the various liquids, wires and other paraphernalia associated with the practice of vaping (smoking electronic cigarettes). After considering various quite complicated designs incorporating drawers, doors and compartments, along the lines of an apothecary box, I decided to keep things simple. I came up with a design based around the sizes of various bottles that he had accumulated.

The corners would be rabbet joints reinforced with dowels made from a contrasting wood, similar to the style of my last project.

Time constraints denied me the luxury of being able to select timber and store it for long enough to let it acclimatise to ambient conditions, so I chose to use some Thermally Modified Tulipwood that I had bought a while ago. Thermally-modified wood is reputedly more stable than its natural form (see discussion here), so wouldn’t need the acclimatisation process.
The requirements were for a box that was 250mm tall overall, and my original design was for a 200mm box with a 50mm lid. But as the wood I had was 175 mm wide, I changed the box/lid ratio to 175mm and 75mm, so that I could make the box parts from one piece without having to edge-join two pieces.
The wood was 175mm wide by 28mm thick. I cut 2 pieces to the length of the box.

.. then re-sawed them on the bandsaw


Then I ran the pieces through the thicknesser, reducing each to 10 mm. During the resawing and thicknessing I discovered that some pieces had checks (splits) running through them, and I found these easy to break in two with my hands, which sort of confirmed that thermally-modified wood is more brittle.


In one case I split the wood in two and cut away the rough parts using the table saw


.. then glued it back together

Using the radial arm saw I trimmed the pieces to length

.. and, using a stop block on the fence, cut the rabbet into the front and back pieces of the box

.. after which I could place the pieces together to see how it looked so far


Using a 4mm slot-cutting bit in the router table I cut a 6mm slot, over two passes, in each of the four sides of the box, to accommodate the base of the box.


Cutting the corresponding four pieces for the lid followed the same procedure. For the lid top I decided to form a raised panel by running the piece vertically past a bearing-guided round-over bit in the router table


I cut the dados for the box’s internal dividers using the radial arm saw. This time I couldn’t cut to the end otherwise the dado would have been exposed underneath the box. So I cut as far as I could …

.. and finished the end of the dado with a chisel


The thinner, removable divider required an 1/8″ chisel

I decided to form ‘feet’ on each corner of the box by removing a couple of millimetres of wood from the bottom of each side, leaving about 25mm at each end for the feet. I used the router table with a 12mm radius straight bit and a stop block to stop the cut 25mm from each end. For each piece, I routed roughly half way, then flipped the board to do the other half so that I was always cutting ‘downhill’ and avoiding tearout.

I drilled the 4mm dowel holes

Then I switched to making the maple tray, using the same rabbet-jointed corners, again cut on the radial arm saw

I placed the tray side pieces in the temporarily clamped box to measure how wide the tray should be. I wanted a millimetre or so clearance front and back. So I chose 155 mm for the length of the end pieces.

With the size of the tray established, I made the bottom from three pieces of maple..

… which I reduced to 4mm thick using the thicknesser

.. and trimmed to size on the RAS

I glued a piece of extra wood onto the end pieces to accommodate the handles. I now had all the pieces for the tray

For the handle cut-out I cut a series of 18mm holes using the drill press

… and then trimmed the waste on the router table with a 12mm straight bit


To shape the outside of the handles I first cut away some waste on the bandsaw . .

.. and then shaped on the spindle sander using a temporary wooden fence to help keep the flat bits even,,

Using two stop blocks on the drill press I cut the pairs of holes for the 3mm dowels


I glued the tray parts together using glue only in the centre of each end of the bottom with none on the sides of the bottom, to allow for wood movement.

I glued the rabbet joints too and then clamped the whole lot together

I made a 3mm dowel cutter using the method described here

… and used it to make some 3mm walnut dowels. (I chose walnut because I suspected the thermally modified tulipwood would have been too brittle.)

After drilling the dowel holes deeper (extending the holes into the previously un-drilled end pieces), I glued and hammered-in the dowels

I trimmed them flush using a pull-saw

. . . then sanded the whole tray smooth using the belt sander

before applying finish, in the form of a water-based satin varnish.

So, that was the tray completed. Now it was back to finish making the main box.
I clamped the back part of the box to the back part of the lid, back-to-back

and marked for the hinge mortices

The hinges, when closed, were 5.61 mm thick

so I decided to cut the mortices to a depth of 2.5mm each. That would leave a 0.61mm gap between the box and the lid, when closed. I clamped a piece of scrap wood either side to prevent tear-out

… and routed between (but not up to) the lines using the hand-held trimmer freehand.

The problem I had was that it was difficult to see the cutter through the dust guard, even with a bright light aimed towards it

It would have been easier had I removed the guard

I cleaned the mortice right up to the marked line using a chisel


Before drilling the holes for the hinges I clamped a sheet of paper between the pieces, to ensure that the hinge would be located in such a position as to allow the lid to open fully backwards without binding


I used a self-centring bit to ensure the holes were central to the hinge’s countersunk holes


I attached the hinges to check the fit – there was a very slight gap, as expected (presumably 0.61 mm!)

Before taking the hinges off, I marked each one so that I could be sure of getting them in the same place when I assembled the box later (in case of any manufacturing differences between each hinge)

Next I prepared all the pieces for finishing using the random orbit sander. It brought out the beauty of the wood.

I applied finish to all the pieces prior to glue-up to avoid the awkward task of varnishing the inside of the assembled box. I didn’t have to varnish the outside faces at this point, but I did so to avoid the wood cupping due to having finish on one side and not the other – especially as this was a water-based finish.


I decided to use a dowel to join the bottom of the box to the centre of the inside box divider. This gave the bottom more strength and also helped centralise the bottom so that it would shrink or expand evenly into the grooves in the box sides if there were extreme humidity changes.

I did a dry run to make sure everything clamped together nice and squarely

I realised that it would be extremely awkward to install the tray supports after the box was glued up, so I made those . .

. . . and installed them, making sure the tray sat evenly on them

Then came the nerve-racking task of gluing everything together


Once the glue had dried I re-drilled the dowel holes deeper and glued and hammered-in all the maple dowels

Then I trimmed them flush using a pull-saw with a piece of paper to prevent marring the surface.


Then I smoothed the whole of the outside and rounded the vertical corners using the belt sander

. . . and the random orbit sander …

I used a clamp on my square as a weight to hold it in place while I aligned the handles


After fitting the handles I took them off again and gave the whole of the outside of the box three or four coats of varnish

. . . after which I fitted a clasp . . .

. . . and put the handles back on. The screws which came with the handles were too long so I used normal gold screws

. . . and then scribbled over the screw heads using a black permanent marker to match the antique brass look of the handles

I used a flexible drive to drill holes for the lid chain

After practising engraving on a scrap piece of wood . . .

. . . I engraved a message to my son underneath the box

. . . and that was it finished! My son loved his present and it was soon put to good use

I am very pleased with the box. Most of it went very smoothly and I was particularly impressed with the look and properties of the thermally-modified tulipwood, and the ease of use and finish obtained from the water-based varnish, which I have previously tended to avoid, preferring oil/spirit-based finishes.
Gallery
Click an image to enlarge it and scroll through other images.


Dimensions


Tools used
- Table saw
- Bandsaw
- 160 mm surface planer
- 330 mm Thicknesser
- Mirka random orbit sander
- Mirka hand sanding block
- 6″ belt sander
- Router table
- 6 mm slot-cutter (router table, slots for base)
- 3/16″ radius roundover bit (for lid panel)
- 12 mm straight cutter ( for handles)
- Radial Arm Saw (rabbeting ends of sides)
- Pillar drill
- 18 mm forstner bit (for tray handles)
- Cordless drill
- 3 mm & 4 mm wood bits (for dowels)
- 3 mm & 4 mm dowel-making plate
- Self-centring hinge bit (for hinges)
- 1.5 mm drill bit (for hinge screws)
- Countersink bit
- Flexible drive (for chain screws)
- Veritas Low-Angle Block Plane
- Marples 12 mm chisel
- 1/8″ chisel
- Various sash clamps / F-clamps
- Steel rule
- Digital caliper
- 6″ steel engineers square
- Pencil
- Permanent marker
- Hammer
- Flush-cut pull saw
- Marking knife
- Automatic centre punch
- Small ratchet screwdriver
Materials used
- Thermally Modified Tulipwood (American Poplar)
- American Black Walnut (dowels)
- American Hard Maple (tray)
- 2 x Solid Drawn Antique Brass Hinges – 25 x 19 x 1.45 mm (Ironmongery Direct)
- 2 x Antique Brass (effect) cup / shell handles
- 1 x Antique Brass (effect) clasp
- 1 x Antique Brass (effect) chain
- 180-grit Abranet abrasive sheet
- Liberon Natural Finish Interior Varnish Satin
- Gorilla wood glue
- Wood filler
- Frog tape
- A4 paper
Things that worked well
- Making 3 mm walnut dowels using the technique described here
- The thermally modified Tulipwood (TMT) worked very well (except see below) – it’s colour was lovely, it machined and worked quite well. It remained stable even when re-sawn to quite thin pieces.
- Resawing 175 mm (7″) wide TMT to 10mm thickness on bandsaw.
- Dipping the hinge screws in wax to help them screw-in more easily
- Liberon Natural Finish Interior Varnish Satin was easy to use, dried quickly, brushes wash in water, and can be flatted using 0000 wire wool to take some of the sheen off.
- Using a small ratchet screwdriver on all the small screws – using a cordless drill or impact wrench for these small screws is not delicate enough and can damage the screws.
- Matching normal gold screws with the antique brass hardware by drawing over the screw head with a black permanent marker.
- By pure luck, the hinges were exactly the right size for the thickness of the box.


Things that didn’t work (and improvements)
- While sanding some pieces, I inadvertently rounded some edges that should have retained a nice crisp edge as they formed part of a joint. I had to use filler to hide the resulting gaps (on the tray)
- When cutting the bottom piece of the tray I allowed for slight expansion all round, but I should have cut it exactly to length because wood doesn’t move in that direction – that way it would have been easier to keep the assembled tray square at the glue-up stage.
- On the radial arm saw, don’t allow the offcut to be between the blade and the fence-stop-block – the saw can catch it and send it flying towards you (as happened when trimming during this project). Or at least use a stop block with a very thin end that will allow the offcut to move away from the blade.
- Using the router trimmer (hand-held) to rout the hinge mortices proved problematic because the dust extraction guard prevented my easily seeing the bit properly, so I couldn’t see the line to which I was cutting. It would be easier with the guard removed, but that would mean no dust extraction. An idea is to cut a viewing slot in the side of the guard to hopefully offer the best of both worlds.
- I should have planned the cuts so that all pieces cut with a particular set-up on a machine are done at the same time, to avoid wasting time and also possibly introducing inaccuracies by having to return the machine to a particular depth or whatever. I didn’t do this and had to mark the column of the radial arm saw to be able to return to a setting.
