
I had been mulling over ideas for a tray for several weeks. My original intention was to come up with a design that had all the grain of the wood in the same direction, so that the end pieces were made of ‘short-grain’. I might yet do something like that, but it was getting complicated and I had a birthday deadline so I decided on this design. I sketched out a few design details on paper. The length and width of the piece were based on a tray I already had. I rounded to 300 mm x 450 mm. I had no idea what the radius of the curved sides should be. I started off by assuming a 60 mm height at the tallest part of the end bits, where the handles are, and I knew that I wanted to go no lower than 10 mm for the height of the side above the base, at its lowest point. So I knew the chord height and chord length of the arc; I just needed to calculate the radius. A quick search on the web found this handy calculator; I put different radii values in and, knowing my chord lengths for the end and side of the tray, could calculate the chord heights (or ‘dips’) of the curves. It turned out that the nice round value of 1000 mm radius gave me exactly what I was looking for: the 60 mm height at the end would drop to 49 mm at the corner and then a further 26 mm drop to give a height of 23 mm at the lowest point at the centre of the long sides, which would give a 10 mm inside depth of the tray.


I used walnut and maple that had been in the house for over a year, so it should remain dimensionally stable. First thing to do was to prepare five 450 mm lengths of the 60 mm-wide maple that I had. Then came my first mistake. I had the tray width dimension in my head when I cut the maple and ended up with 300 mm lengths instead. Damn! So I put those aside and cut some 450 mm lengths. I re-sawed these in half so that I had five pieces 10 mm thick.

As usual I arranged them so that the grain was all running the same way, to aid planing later. Once I had them in an arrangement I liked, I drew a triangle on them so that I knew which piece joined to which piece.

I used biscuits to help align the boards during glue-up. I marked lines across adjacent pieces for where the biscuit slots would go. I used the router table to cut the slots

Then glued them all together


I would be able to get one side piece and one end piece out of a single length of Walnut, So I cut two 450 mm lengths on the table saw


The sides were to be 12 mm thick, so I re-sawed the 20 mm walnut pieces down to about 14 mm and then thicknessed them using my thicknesser

To cut the arcs in these, I needed to rig-up something on my bandsaw. I found a suitable piece of melamine-faced chipboard from an old desk, and a piece of pine, also from a (different) old desk. I cut a slot in the first bit using the table-saw. The slot would fit over the bandsaw blade

I cut a piece of scrap pine and notched it to support the end of the surface. Using bits of an old inner tube for grip, I clamped the ‘jig’ to my bandsaw table

..and screwed the pine piece at a point 1000 mm from the edge of the bandsaw blade so that it could swivel on top of the other piece


I ran the pine piece through the bandsaw, swivelling from the pivot point

Now I knew where the cut line would be, I attached my first workpiece to the jig. With 23 mm of the workpiece overhanging the end, I aligned the centre of the workpiece with the radial line (that passes through the pivot point), and making sure that the piece was at 90° to the radial line, I screwed it to the jig using 3mm x 20mm self-drilling screws

I then fed the whole thing through the bandsaw to cut the arc

This resulted in one side piece (right) and the remainder which would form one end piece after further cutting. I did the same thing with the other piece of walnut I had, to form the other side piece and the other end piece.
I trimmed equal amounts off each end of the wider pieces to make the 300 mm end pieces

I also ripped the end pieces to the correct width, after lining them up with the side pieces and marking the area to be cut. Then I rabbeted the ends of the side pieces using the radial arm saw

The rabbet depth was 9 mm, leaving 3 mm to overlap the ends.

Next job was to rout a slot, 8 mm wide and 6 mm deep in all four pieces to accommodate the base


I put the pieces together to see how it looked so far

Next, using a 22 mm forstner bit in the drill press, I cut four holes in each end piece, drilling from each side to prevent tear-out.


I elongated the holes using a 12 mm straight bit in the router table. I could run the flat edge along the fence, but for the curved edge I clamped a piece of scrap wood to the fence and holding the workpiece at each end I carefully pushed it away from me into the cutter and then guided it along the temporary fence. Luckily the piece of scrap wood I’d used had a slight bow which gave it some springiness, which afforded me very good control over the depth of cut I was making, allowing me to create a very straight cut.

Next I used a 3/8″ bearing-guided round-over bit to form a thumbnail profile on the top edge of each piece (only part of the curved cutter was being used)

I used my block plane to round off the protruding parts


Part of my design was to have small 4 mm maple dowels inserted from the ends into the side pieces. They had to be drilled in at a slight angle because there was only 9 mm of the side pieces to drill into (because 3 mm was used for the rabbet overlap. I used a digital angle finder to measure what looked like a suitable angle. It measured 97°.

So I had to incline the wood to 7° on my drill press to drill the holes into the end pieces

I used various pieces of wood clamped in place to ensure the correct angle. 6.9 was close enough. I proceeded to drill the holes.

It wasn’t until I had drilled all-but-one of the holes that I realised I was drilling them 7° in the wrong direction! They should have been angled towards the outside of the tray, but I had accidentally angled them inwards. I quickly put all the parts together to see the effect of this cock-up. The result was that part of the holes were visible inside the tray. Damn.

I took a break and considered the many ways I could try to address the mistake. In the end I decided to trim 1 mm off each end of the side pieces, making the tray 2 mm narrower. That allowed the holes to be covered completely. Then using the same holes I re-drilled them with the angle in the opposite (correct) direction. I also trimmed the width of the base part by 2 mm.
For some reason (probably to avoid the sometimes awkward job of spraying the inside of the tray) I decided to spray the base and the inside faces of the sides and ends before assembly. I masked the rabbets and the grooves to avoid lacquer getting on the surfaces to be glued.

Once the lacquer had dried I removed the masking tape and applied some more tape next to the glue joints to prevent any glue squeeze-out getting on the wood

Then I glued it all together using tape stretched around the corners to hold it together while I got the clamps on


Once the glue had dried I removed the clamps and drilled through the dowel holes I’d made earlier and into the side pieces. I glued 4 mm maple dowels into each hole, tapped in with a hammer. I had made the dowels myself using an ingeniously simple jig, described here.


Once the glue had dried I sawed off the protruding dowels and used a chisel to pare the ends flush.

I then sanded the rest of the now-assembled tray using my random-orbit sander and Mirka hand sanding block. I masked the bottom of the tray to avoid getting any over-spray on it. I applied maybe 4 or 5 coats of lacquer (at about 10 minutes intervals).

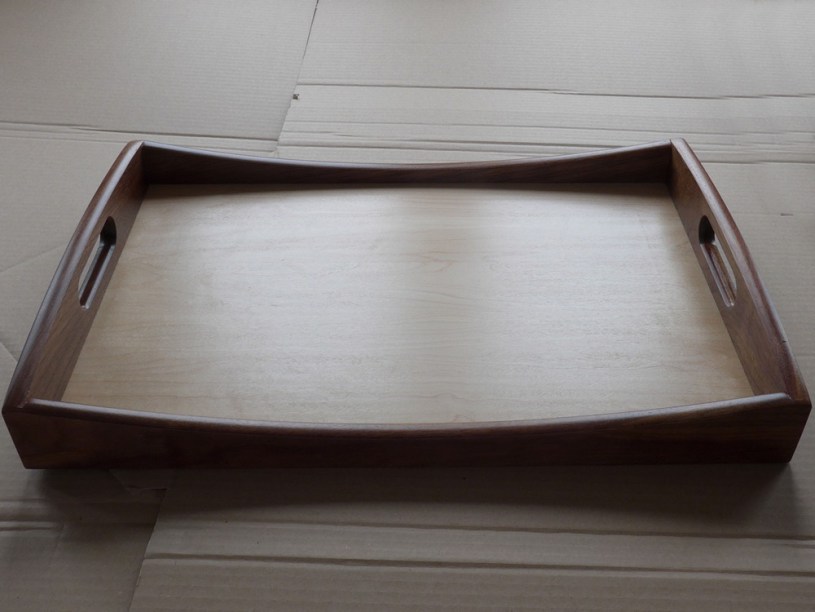
And so it was finished. I’m very pleased with it despite the screw-up with the dowel holes. If I made another one I would probably spray the whole thing once it was assembled and not do the individual parts beforehand. I used an alkyd resin lacquer which should provide sufficient protection for years of good service.
Gallery
Click an image to enlarge it and scroll through other images.


Dimensions


Tools used
- Table saw
- Bandsaw
- Circle-cutting jig
- Online circle chord calculator
- 330 mm Thicknesser
- Mirka random orbit sander
- Mirka hand sanding block
- Router table
- 6 mm slot-cutter (router table, slots for base)
- 1¼ x 3/8″ radius roundover bit (for thumbnail profile)
- 12 mm straight cutter ( for handles)
- Radial Arm Saw (rabbeting ends of sides)
- Pillar drill
- 22 mm forstner bit (for handles)
- Cordless drill
- 4 mm wood bit (for dowels)
- 4 mm dowel-making plate
- Veritas Low-Angle Block Plane
- Marples 12 mm chisel
- Various sash clamps / F-clamps
- Steel rule
- Digital caliper
- Digital angle finder
- 6″ steel engineers square
- Pencil
- Hammer
- Flush-cut pull saw
Materials used
- American Black Walnut
- American Hard Maple
- Lamello beech No. 0 biscuits
- 180-grit Abranet abrasive sheet
- Alkyd resin lacquer
- Gorilla wood glue
- Frog tape
- A4 paper
Things that worked well
- The radius cutting arrangement on the bandsaw worked very well.
- Cutting an end and side piece with a single cut
- Using dowels as both corner reinforcement and design detail
- Using a rabbet joint on corners as opposed to mitre, box, etc
- New thicknesser did a good job levelling the 8 mm thick base
- Creating thumbnail profile with edge of roundover bit
- When routing the profile on the curved parts I used a ‘climb’ cut when going against the grain to prevent tear-out. This was OK to do because I was removing such a small amount of wood. Worked well.
- The alkyd resin lacquer gave a nice-looking and hard-wearing finish. It was easy to apply (by spray), and could be re-coated very quickly – within a few minutes. However, although touch dry within minutes, it was tacky to the touch for days. It only felt really dry on the fifth day after applying.
Things that didn’t work (and improvements)
- Accidentally drilled dowel holes angled in wrong direction – DOH!
- Spray finish picked up some small specs of dust – shouldn’t have sprayed in dusty workshop
- New spiral cutter block thicknesser leaves very slight dips along the length of the wood. Not visible by eye but you can feel them. I wasn’t expecting this, but read about it online and it’s a common trait. Maybe I was expecting miracles, hoping not to have to do any sanding! I’ll try finishing with smoothing plane and/or scraper next time I use it
