
Some tools are so good that they’re worthy of a purpose-built case. And that applies to my new battery-powered chainsaw. It’s probably the most useful tool I’ve recently purchased, in terms of sheer convenience. Just pick it up and take it wherever you like in the garden or elsewhere. No power outlet required as would be the case with an electric chainsaw. No petrol required; no rushing to the petrol station because you’ve run out of fuel. No problems trying to start the bloody thing. It’s light, not as noisy or smelly as a petrol saw; when not in use it’s not running so there’s peace and quiet while not in use, unlike a petrol saw. It lasts ages on one charge of my 4Ah battery. Like any chainsaw it still needs chain oil to keep the blades lubricated. Although not as powerful as some petrol saws, it dealt with everything I used it for including deciduous trees of 9-10″ diameter. I’m so glad I bought this. All that was missing was somewhere to keep it.

I measured the dimensions of the saw and calculated that I needed a box with internal dimensions of 2 ft long, 9″ high and 9″ wide. Because of the irregular shape of the saw, there would be loads of unused space to the side of the blade so I decided to create a separate space there to store associated accessories.
I used Sketchup to design the box. I have my Sketchup set to metric scales so I converted in my head from inches to mm, using 25 mm = one inch. So 2 ft = 600 mm, 9″ = 225 mm, etc. The ply I was using was 9 mm thick, so it got added on to the internal dimensions, so for the 600 mm internal length I had to add 2 lots of 9 mm for the ends to get the external dimensions, so that made it 618 mm. In a while you’ll realise why I’m labouring this point.

I printed out the plan so I could refer to it in the workshop. I chose some straight-as-possible 9 mm ply boards

and cut them to the dimensions on the plan using the table saw. First I ripped to width


Then I used a stop block clamped to the fence to crosscut the ends and internal walls.


To cut the slot for where the chainsaw blade will fit, I used a 20 mm forstner bit to cut a series of holes, using a fence to keep them aligned. I drilled from both sides to prevent tear-out.


Then I used the router table to cut out the waste and join all the holes together to form the slot. I could have cut the slot using a jigsaw, but it still would have needed tidying up and wouldn’t have been any quicker.

I chose to use biscuits to hold the box together, but I used the router table to cut the slots instead of a biscuit jointer. I chose size 0 biscuits


I stained the inside faces of the box before assembly, firstly because it was easier and secondly because it would prevent the issue of stain not working properly on any glue squeeze-out inside the box.


I glued the pieces together and clamped. It was a laborious process gluing and inserting all the biscuits

It was round about this time, while measuring the box, I realised that the inside length of the box was not 24″, as intended. This baffled me for a while until I realised that 1 inch is not exactly 25 mm, and that over that sort of length the error compounds quite a bit. That rough conversion I had used at the design stage when transferring my measurements to Sketchup was quite inaccurate. In fact the box was about 1 cm shorter than intended. That was worrying because I had designed the box to fit the saw very tightly, and now I wondered if the saw would be able to fit! I checked and luckily it just squeezed in, with no room to spare.
I glued and fixed the internal dividers using the brad gun

I filled all the brad holes and any other anomalies on the outside of the box and thoroughly sanded the whole of the outside. Then I stained the outside faces.

Even though I had sanded the filler extensively, it still revealed itself around the brad holes when I came to use stain. The filler had obviously seeped deeper into the wood and caused areas where the stain wasn’t as effective, causing lighter patches. This was extremely frustrating.

I sprayed the box with clear lacquer

The Lid
It took me ages to decide what sort of lid to make. In the end I decided on a frame and panel design. I cut the four frame pieces to the dimensions of the box and laid them out and marked each corner so I could keep them all in the right place and the right way round

I cut the slots for the panel using the same slot-cutting bit I had used for the biscuits.

For the two long pieces I needed to stop the slot short of the ends otherwise it would be visible at the end of the piece. Unfortunately I wasn’t paying attention as I was doing this and I routed one slot right through to the end! DOH!

It took several passes with the router at different heights to make the slot wide enough for the panel. I did a dry fit to see what I had so far.

I decided to use dominoes for the frame joints and chose size 6 x 40 mm.

I cut the mortices for the dominoes

I cut the panel from the same 9 mm ply. I did a dry fit to see how it all went together.

Here you can see the result of my cock-up earlier when I accidentally routed the groove right to the end of the rail on one corner

I chamfered the inner edge of the frame pieces using a 45° router cutter, again being careful to stop before the ends. I cleaned up the corners with a chisel. I decided to stain the panel and the chamfers before putting it all together.

Then I glued and clamped the pieces for the top together. I aligned it on top of the box, making sure the lid aligned with the carcass. That was more important than it being square.

I inserted a small plug of wood to cover up my previous error, and sanded the frame smooth


.. then stained the remainder..

The Handles
I had originally thought of having some sort of handle on the top of the box, but decided eventually to just have a handle at each end. I used a piece of Walnut I had lying around.
I used a three-flute surface machining cutter to rout the ‘finger grips’

Using stop blocks clamped to the fence I routed both handles from one piece of wood to make it safer to hold.

I cut the handles to size and rough shape using the bandsaw

.. and then created radiused corners using the disc sander

Then I used a 1/4″ round-over bit in the router table to round over the outside edges


I decided to use dowels to fix the handles. It’s a strong joint and makes accurate positioning easier. I first drilled the handles. It was not critical to be accurate at this stage because alignment would be done later

Using dowel alignment points in the holes,

and a temporary wood spacer clamped to the box to ensure the handles are parallel to the top, I pressed the handle down firmly to mark where the corresponding holes should be drilled on the box end ..

.. and then drilled the holes

The Hinges
I had some hinges that were too big for the thickness of the plywood so I chose to mount them on the outside. A bit ugly, but as this was only a tool box I didn’t mind. I marked around each hinge and roughly cut out the recess using a chisel

Then I used a 6 mm bit in my hand-held trim router to flatten the bottom of the recess.


I could have just used the router alone and avoided much of the chiselling. Using a jig with the router would have made it even easier.


Using a self-centring hinge bit I drilled the holes for the screws. I used a sheet of folded paper to set a tiny gap between the lid and the box before drilling. If you don’t do this you can find that the lid is too tight to the box and won’t close properly.

I decided to add some walnut blocks inside the box into which the hinge screws could go, to add strength

I decided not to glue the handles on, but used one screw from inside the box and the unglued dowels to hold in place. I’m not sure why I did this. I could always re-use the handles on something else if I wanted to. I trimmed the protruding part of the dowels and stained the ends.

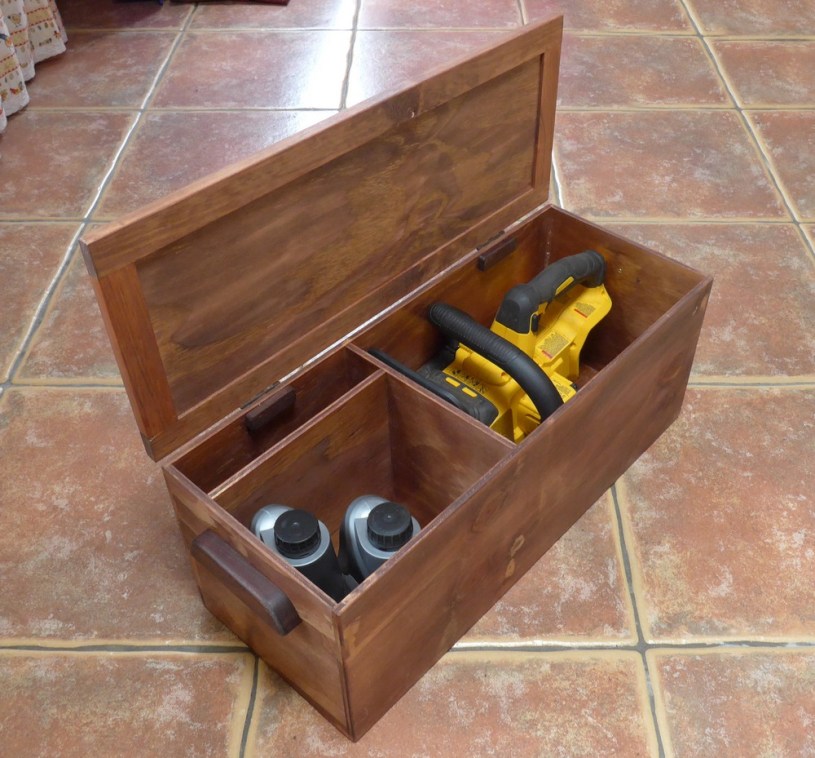
The chainsaw just about fit with zero tolerance!


I did have other ideas for this box that got shelved along the way. I was going to have clasps to hold the lid closed but I don’t really think they’re required. So I left it there. It will certainly serve its intended purpose.
Gallery
Click an image to enlarge and scroll through all images


Tools used
- SketchUp
- Table saw
- Surface planer (Jointer)
- Bandsaw
- 6″ Belt sander
- 9″ Disc sander
- Random orbit sander
- Drill press
- Router table
- ½” straight bit (router, for internal slot)
- 40 mm three-flute surface-machining cutter (router, for handles)
- ¼” round-over bit (router, for handles)
- 45° chamfer bit (router, for lid)
- 4 mm slot-cutter (router, for biscuits)
- 20 mm Forstner bit (drill press, for slot)
- 8 mm drill bit (drill press, dowels)
- 8 mm dowel centre points
- Self-centring hinge bit (for hinges)
- Domino jointer
- Cordless drill
- Cordless brad nailer
- 120 grit belt (belt sander)
- Marples 18 mm bevel edge chisel
- Various clamps
- Permanent marker
- Measuring tape
Materials used
- 9 mm plywood
- American Black Walnut
- Pine
- #0 biscuits
- 8mm dowels
- 6 x 40 mm dominoes
- 25mm 18g brads
- 50 mm brass hinges
- Cellulose lacquer spray
- Colron American Walnut spirit-based wood dye
- Gorilla wood glue
Things that worked well
- Dowels were an easy and accurate way of fixing the handles
- Using a piece of paper to shim the lid before fixing hinges.
- To keep the drill square to the work when drilling the dowel holes I used a large flat 25 mm thick piece of hardwood into which I had drilled an accurate hole using the drill press. I used that hole, with the piece flat on the work, to drill through first, which guided the drill accurately into the work. Bit cumbersome – maybe use another kind of jig for this.
- Self-centring hinge bits worked really well, as usual.
Things that didn’t work (and improvements)
- Don’t measure in inches and then work in metric!
- Don’t rout through the end of a stopped groove. One way to improve the design would have been to use routed tenons on the ends of the stiles to fit into the grooves on the rails of the frame – that way you could run the groove along the whole length of all four parts. Then you wouldn’t have the trouble of stopping the groove – you should never stop the groove, man!
- When using my new cordless brad nailer, some of the brads missed the mark and went down the side of the piece of wood and not into it. That’s because the brads don’t come out central to the head. I should practise with it and maybe mark on the head where the brad will eject from.
- Don’t fill brad holes and then expect to sand smooth and stain without a lot of problems. One solution to this I have seen is to put masking tape on the wood and brad through that and then fill the hole with the tape still there – will try this next time. Clear tape would probably be the best I would think.
