
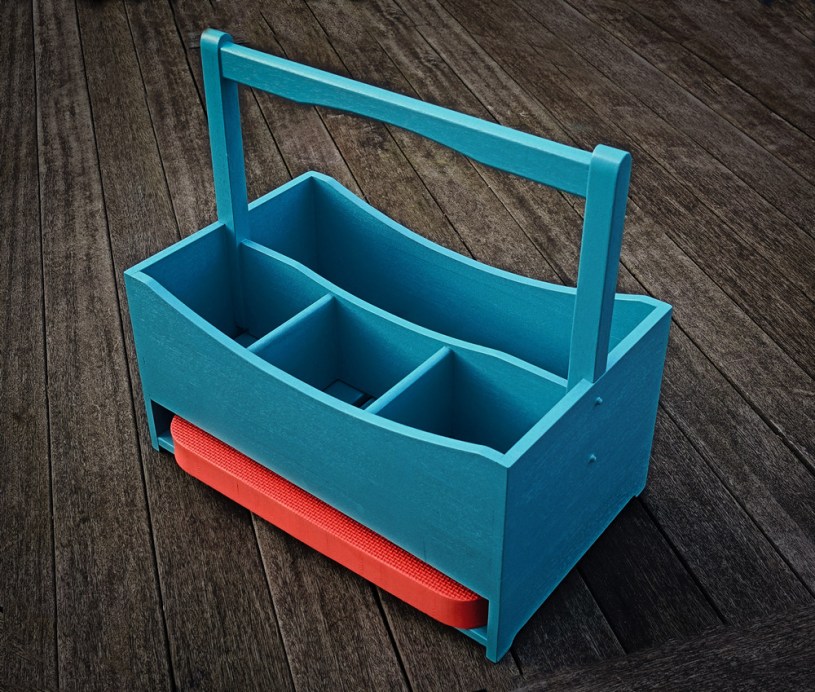
For this project I transformed some African Mahogany fence posts into a useful garden tote. I also made what started off as a simple design significantly more complex, due to the joinery used and my aversion to using screws or any other metalwork to join wood to wood. My piece was inspired by something I saw in an American projects book

The original design called for 7/8″ thick timber. That seemed to be overkill to me, and would result in a very heavy item, even when empty. Also it had a solid bottom which would collect water if left outside in the rain or from water dripping off tools, etc. So I decided to use much thinner wood and to make the bottom and shelf from slats to allow drainage (and further reduce weight). I try to avoid screws whenever possible, so I used box-joints, loose tenons (dominos) and dowels to keep it together. I realised that the use of thinner wood would make my version look a little less rustic.

A couple of years ago I bought fifteen lengths of 54mm square rough-sawn African Mahogany from a fencing company on ebay.
Listed on the wood database as being ‘moderately durable’, I chose to use this mahogany over softwood for the project, reasoning that it would fare better than softwood in an outdoors-ish environment.
I resawed the mahogany down the middle

and then each strip down the middle again, to end up with lengths just over 12mm thick.

Then I thicknessed it all down to 11mm

I glued the strips into wider boards – 3 strips wide for the sides and 4½ strips for the deeper end pieces. I sawed the resulting panels to length and used my super-duper box-joint jig to cut quite large box-joints in the sides and ends, cutting two pieces at once


I did a dry fit to see how it looked so far

I used an online chord calculator to establish the radius of the curve to be cut in the top edge of each side. It was 1000 mm exactly. I used my bandsaw jig to do this, but accidentally cut the wrong edge! I had cut a curve into the lower edge of the box. Doh! After considering my options, I decided to just glue the cut-off piece right back on, and then proceeded to cut each side from the correct edge. For some reason, the bandsaw was leaving a very irregular cut and drifting off the line. I couldn’t understand why it did this, until later. I smoothed the curves using the spindle sander.
Using two stop blocks on the router fence, I cut a section out of the base of the end pieces to form ‘feet’, using a 12mm straight cutter

Next I cut the long slats that would form the lower shelf and the short slats that would form the bottom of the box. I used the Domino jointer to form mortices in the end of each slat

… and the corresponding mortices in the side pieces. I didn’t do much accurate measuring for this. I just sort of eyeballed it

I did another test fit to see what I had so far

It was taking shape. I painted the slats at this stage, thinking it would be easier to do them now rather than after assembly

The only things left to make were the internal dividers and the handle. I decided to rebate the handle posts so that their outer edge would be flush with the outside of the box, for a more aesthetically pleasing look


I ‘broke’ the sharp edges of the handle posts by rolling them on the belt sander, then I rounded the tops on the disc sander.

For the curves on the handle bar and on the central divider, I used the already-cut curve of a side piece as a template to mark the curve with a pencil and then cut almost to the line on the bandsaw.

Using two pieces of double-sided tape..

I stuck one of the side pieces to the central divider, aligning the curve with the drawn curve on the divider.

I used a bearing-guided cutter in the router table to trim the divider piece exactly to the line using the side piece as a template to run the bearing along.
I did exactly the same thing to form the curve on the handle bar

After unsticking the handle from the side piece, I rounded over the edges on the router table

.. and then formed mortices in the ends of the handle using the Domino

Next I clamped the divider to the handle to mark the position of the loose tenons

… and then cut the mortices using the Domino

Because of the lack of depth available on the rebated sections of the handle posts, I trimmed the lengths of the dominoes, and marked them to remind myself these were short dominoes

I made the two smaller dividers and morticed them in the same way.

I now had a complete kit of parts ready to be assembled


First I glued the handle and central divider together, using Gorilla wood glue


and then glued the smaller dividers

For the remainder of the glue-up I used Cascamite, for its longer open time, because there were so many pieces. I ignored the instructions and put two tablespoons of Cascamite in a yoghurt pot and added water gradually while stirring continuously.

This time the Cascamite cured in the advertised six hours. I had heated the room to about 18°C.
Once the clamps were off, I sanded the protruding parts of the box joint fingers using the stationary belt sander. Not really the best tool for the job; I caused a couple of scuffs while doing it.

The pieces were now ready for the final coat of paint


The handle/divider assembly was attached to the main part using dominoes at the end of the small dividers, and then dowels from the outside into the handle posts. I thought I’d make a feature of the dowel ends, so I rounded them over using drill and sandpaper, and left them proud


I painted the ends of the dowels and there it was finished!


Tools used
- Table saw
- Bandsaw
- Tuff Saws SuperTuff Fastcut Bandsaw Blade 3/4″
- Radial arm saw
- 13″ thicknesser
- 6″ planer
- Router table
- ¼” roundover bit (router)
- 12mm flat bit (router)
- Festool Domino DF500 Jointer
- Veritas low-angle block plane
- Record No4 smoothing plane
- Robert Sorby square
- Chisel
- File
- Cordless drill
- 6mm wood bit
- Various clamps
- Hammer
- Automatic punch
- Glue brush
- Online circle chord calculator
Materials used
- African Mahogany
- 28 beech dominoes
- 4 off 6mm beech dowels
- 80-grit Abranet abrasive sheet
- 180-grit Abranet abrasive sheet
- Double-sided tape
- Wood filler
- Cascamite wood glue
- Gorilla wood glue
- Cuprinol Garden Shades (Beach Blue) – three coats
Things that worked well
- Tablesaw box-joint jig worked very well
- Mixing Cascamite by intuition as opposed to measuring worked well – consistency should be roughly that of PVA glue
- Cuprinol Garden Shades paint was easy to apply, easy to touch-up and fix runs. Dries quickly and cleans with water.
Things that didn’t work (and improvements/lessons learned)
- I sawed the curve on the wrong edge of the side piece – In my defence, the piece looked almost symetrical, but I should have paid more attention
- Bandsaw cut was irregular and drifted when using curve jig. Later I discovered that the upper rear blade support bearing was 3 or 4mm from the blade. Don’t know how I missed this when fitting the blade. Maybe I hadn’t tightened enough.
- When I came to cut the first domino mortice, I pushed the jointer against the workpiece which was up against the fence. I think I assumed that the pressure of the machine would hold it in place. Wrong! The oscilating blade moved the workpiece, and ended up splitting a corner of the work. It was easy to glue back, but the lesson was to make sure the workpiece cannot move. For all subsequent domino mortices I clamped the workpiece firmly and also used a slower feed speed with the jointer, especially on first contact.
- At one point I moved a piece that had one half of a box joint to the house for painting while leaving the other half in the workshop. Because of the differing humidity levels, when I brought them together again, the box-joint fingers no longer fitted! Predictable really. Another reminder that wood is ‘alive’ to humidity levels. As soon as they were both in the same place and had acclimatised, the joint fitted perfectly again. Lesson: always keep both halves of jointed wood together in the same environment
- The slats at the bottom of the box have irregular spacing. I had assumed that, with the wider domino mortices, I’d be able to slide them around to even them out during glue-up, but it didn’t work out that way. In future, measure and mark accurately and use some sort of alignment mechanism for the domino jointer to get consistently-placed mortices.
- The featured dowels almost worked, but some of the fluting on the dowel was still visible. I should have rounded them over more
- Smoothing the box-joint fingers using the stationary belt sander was tricky because of the size of the piece – maybe ROS would have been better

Very Very good Vince, That’s my boy!!! Dad.
LikeLike
Cheers Dad. You inspired this hobby of mine, from a young age. So it’s all thanks to you!
LikeLike
A well executed piece. Enjoyed the write up. My kids love to draw. Something similar to this could also make a very nice tote / craft box for children to carry crayons and markers in and papers to draw on below.
LikeLike
Thanks for your comment. I’m sure your kids would love to have something like this to carry their bits in. One each, of course!
LikeLiked by 1 person
Not sure I have that much African Mahogany laying around. Lol.
LikeLiked by 1 person
Very nice… But the paint covers up the wood!
LikeLike
Thanks. You’re right, and I normally abhor painting over wood, especially mahogany. I’m sure I had a good reason for it at the time!
LikeLiked by 1 person