
Sometime recently I had managed to ruin the blades on my planer/thicknesser (P/T). I noticed that after I had used it to square-up the edges of some timber, the finish was extremely poor with deep grooves running along the wood. I looked at the blades on my P/T and saw that part of the blades close to the fence had become serrated.

I really don’t know what had caused it, unless it was that extremely tough Wenge that I had tried to used on a box a few projects ago. It’s difficult to believe that wood alone could have caused the damage. Anyway, the blades were well overdue for replacement so I ordered some new blades from Woodford Tooling at £20 a pair. Replacement blades for my P/T, a Lunar Woody, are no longer listed, but they are the same blades as used on the Mafell AD160, which is essentially the same machine with a different badge.
The blades are quite easy to replace. The first thing is to unplug the machine, remove the fence and slide the blade guard all the way over to expose the cutter block.

Using an open-ended spanner, loosen the three tensioning screws/bolts by turning clockwise (away from you).

… then slide out the blade and blade holder away from you, turning the cutter block slightly to line up for the best position.


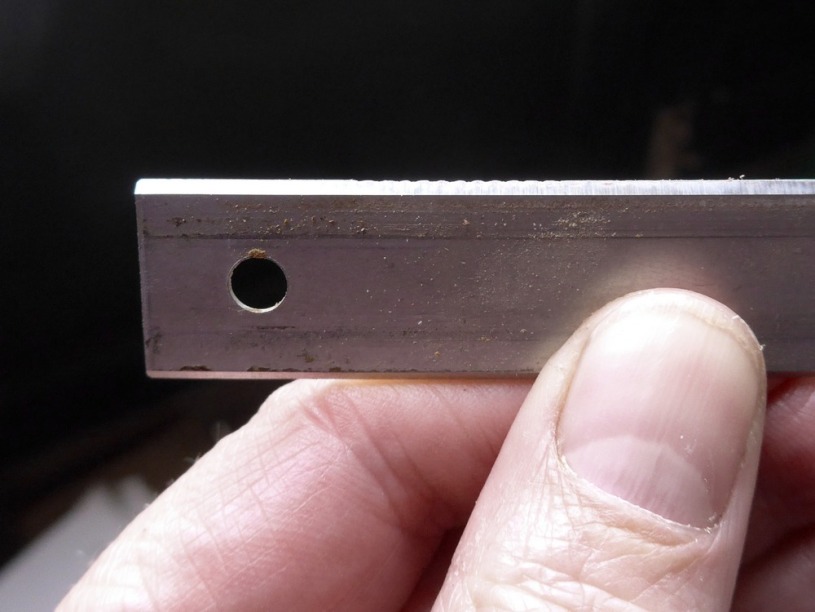
Lift off the old blade from the alignment lugs..

..clean up the blade holder, and the housing in the cutter block, and place the new blade over the lugs

… and slide the blade holder/blade back into the cutter block, making sure that neither end is protruding beyond the edge of the table

Press the blade down into the housing using a piece of scrap wood while you tighten the three tensioning screws (turning the spanner towards you).

The blades now need checking for adjustment. They need to be fractionally higher than the outfeed table, when at their highest point. To check this, place a steel rule on the out feed table and line up the ruler with a fixed point on the planer. I lined-up the 100 mm mark on my ruler with the edge of the infeed table

With the blade initially to the left of the ruler, rotate the cutter block so the blade moves towards the right and ‘drags’ the ruler along as it catches at its highest point. The ruler should move 2-3 mm if the blade is correctly positioned. On mine, it moved 7 mm, as can be seen here

That meant my blade was too high and required adjustment. This is done by loosening slightly the three tensioning screws and adjusting the two grub screws on the knife holder using an allen key (wrench)

I needed to lower the blade so I loosened the grub screw (anti-clockwise) to allow the blade holder to sink further down into the housing. Then I tightened the tensioning bolts, again holding the blade firmly with the piece of wood, and checked with the ruler again. This process is one of trial and error and I had to repeat these steps 4 or 5 times before it was adjusted correctly. The ruler check should be done near each end of the blade. Then the whole process is repeated for the installation of the second blade. Then I re-installed the fence, plugged the machine in and checked its performance with a piece of scrap pine.

The resulting finish was amazingly smooth. I should have renewed the blades years ago!
Tools used
- 8 mm open-ended wrench
- 4 mm Allen key
- Steel rule
- Lump of wood
Materials used
- Replacement blades for Mafell AD160
Notes
- It took about 25 minutes

Thanks Vinn for your post on replacing the blades on the Mafell AD160. I too purchased new blades from Woodfords and have difficulty in setting them correctly. I shall follow your instructions and get them set correctly. Fiddly things to get right. Have you sharpened AD160 blades. Thanks Dave
LikeLike
Hi Dave, thanks for your comment. No, I have never tried sharpening. The blades I replaced had quite deep nicks so I don’t think sharpening would have helped, but there’s no reason why you shouldn’t be able to.
Cheers
Vince
LikeLike